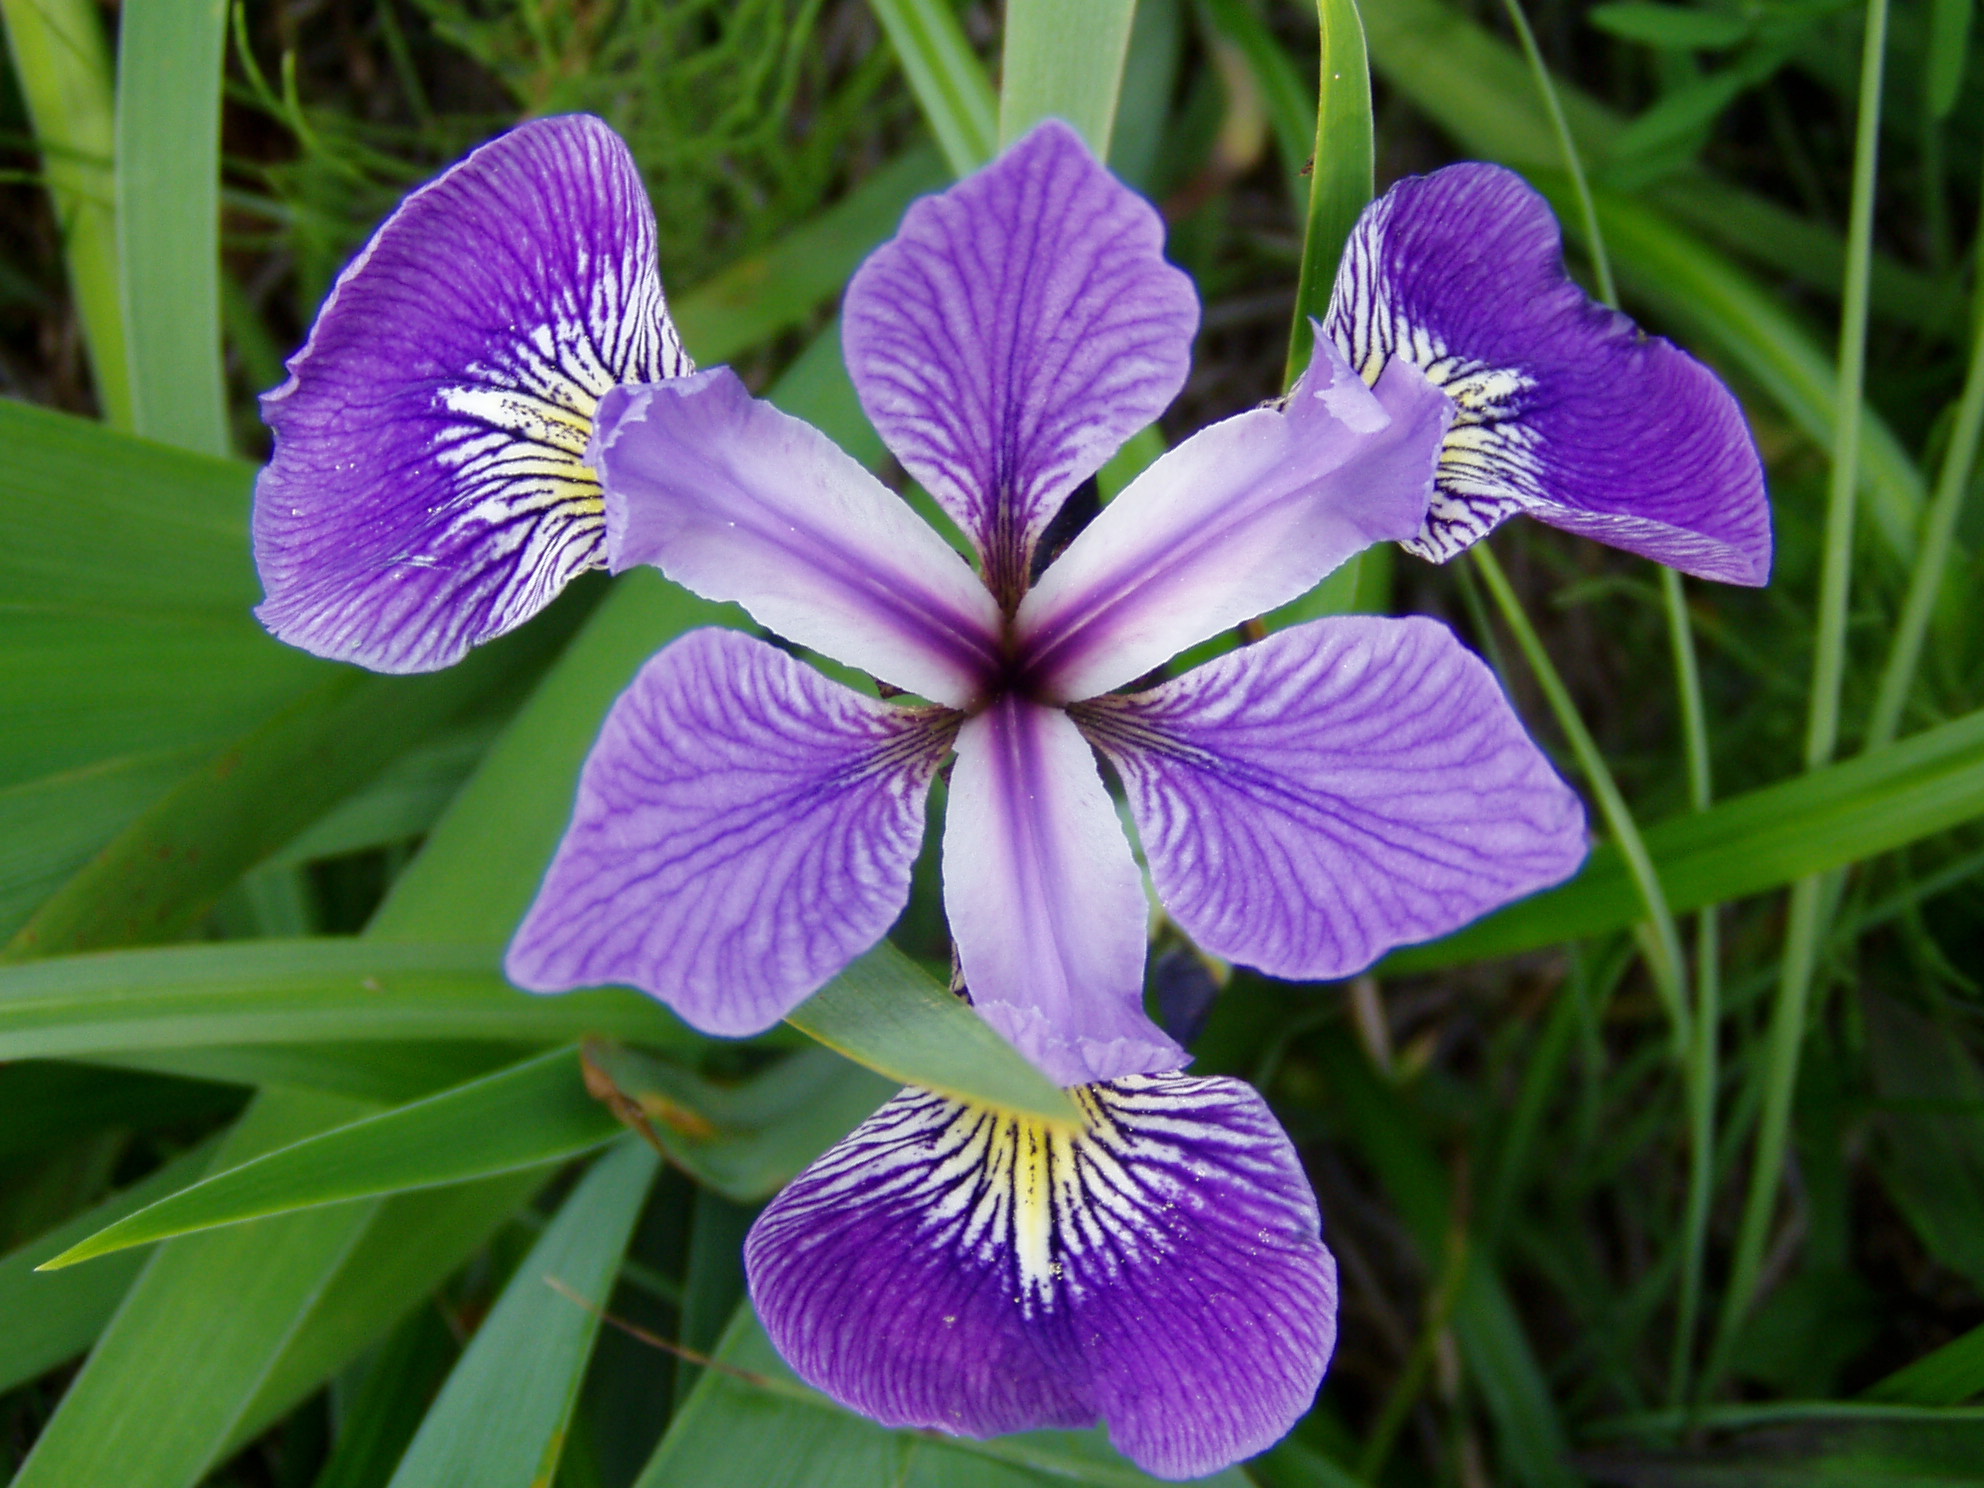
Tabs

Showing posts with label Demonstrative Speeches. Show all posts

Sunday, December 11, 2011

Before and After Speech Class

During the first steps in becoming a professional speaker, many of the speeches were terrible. They were supposed to be terrible, not that I purposely made them unappealing, but it was the way of the Webb. However, after writing a few outlines, speaking in front of many peers, teachers, demonstrating, informing, and persuading the audience, improvement showed. I used to always hold a note card to feel more comfortable, and to reminded myself of what I had written in my outline; but now as I began aiming for perfection, I felt comfortable in front of audiences as long as I knew and made it clear to the audience of what my purpose was. Giving zingers to end the speech was a favorite part of the speech process, clear senses of the ending had to be done correctly. Comfort was a problem, but engaging to the audience, keeping them occupied and attracted was another. Through the days of speech class, knowing not only how to write an interesting speech was a serious matter, but also knowing how to grab the focus of the audience to the main points, the idea, was also very important. Variations in tone, giving emotional intonations are crucial and achieved throughout the process of speech perfection. Enhancing hand gestures made clear of what the points are and helpful to attract attention. Now, through practice and aim, the target has been shot down; all the qualities of a beautiful speech has been absorbed in a mind that knows perfectly how to use these qualities.The overall improvement is a wide range, from the terrible murmurs in the beginning to the well-achieved speeches towards the end. Without knowing these skills, and how to use them would have been a great loss in a professional speaker.
~BEFORE~


~AFTER~

Demonstration Speech 3 Video Self Evaluation

Video Self Eval (demo 3)

Wednesday, November 16, 2011

I'm Going Through Changes

After careful consideration into deciding whether the first of second speech to do for the final of demonstration speeches, I have came up with the best decision: The first one.


In this speech I taught the audience How to Build a kite and ways to decorate it. It was an awesome speech, but I am going to make it better. There were many minor modifications, but here are the three main alternations
1. In the introduction, I do not have a motivation. Thus, I included one after I said what I am going to do today: Kites are usually flown on windy days. It is a great activity to do with someone and a way to make a use out of the windy weather. Trust me, I've experienced it, Back where I come from, It is windy everyday and there wasn't much to do, so I flew kites all the time.
2. To indicate movement from my last body to the conclusion, I have inserted a rhetorical question: So what have you learned today?
3. In the first presentation of this speech, I included a little description of a crappy day. However, it did not refer back to the introduction, thus I have rewritten a more pleasing and relevant ending: Knowing this, when it is windy outside and you feel bored, grab a dew materials and build a kite with someone. Trust me, it will be the best day of yor life.

So there you have it, the only three main changes that will enhance my speech.

Monday, November 14, 2011

Demonstration Analysis

In the first speech, I taught How to Build a Kite. I basically did a very good job on this speech; it was a successful speech that ended with the kite failing. I taught the audience fairly well, but I had no enhancing tone, visual aids, and not much eye contact. I think that this was the speech that I improved most on, and the speech that I practiced well on. I had no problem saying the materials, the steps on how to build a kite, and the alternatives. This speech was overall, an improving, demonstrative speech needing more tone. However, knowing the fact that it can be perfectly achieved, it needs more work on tone, and attraction.

The second speech which was a classic origami demonstration, was a speech that was distracted and not as improving as the first one. I needed to practice more, I needed to connect the conclusion to the introduction. This speech was a bit rusheed, but if practiced, it would be perfect. Body language was sufficient in this speech, and in addition, it produced eye contact among all the audience, instead of the teacher. This speech was a bit long, it needs minor modifications, and the more practice needed. Overall, this speech was a complicated, quick speech with exceeding amounts of interactions with the audience. I especially loved the parts in which i asked "right?", and it felt professional.

Sunday, November 13, 2011

Demonstration Speech 2 Video Self Evaluation

Video Self Eval (demo 2)

Tuesday, November 8, 2011

How to Make a Paper Iris

Purple Paper Iris

Materials
1. A piece of A4 paper (color, texture and pattern can vary)
2. Scissors
3. Coloring Utensils

Steps
1.     Take a piece of A4 sized piece of paper, then take one of the corners and fold it to the other side of the paper to make it align with the opposite side.
2.     The piece of paper should look like a trapezoid. Then take the scissors and cut the bottom half of the paper to form a perfect square. Make sure you do not cut the other side of the paper, only cut the side that does not overlap with the folded area of the paper.
3.     Now with the perfect square, fold the square across in half to form a triangle. Fold the triangle again to make a line dent in the middle of the first folded triangle.
4.     Unfold the second folded triangle and you should see a line in the middle of the first folded triangle. Turn your triangle to make the 90 degrees corner face yourself.
5.     You should have a gap on either side of the triangle, so push your finger into the gap (you may hold down the bottom of the triangle if it helps) and bring the gap up, then fold the top corner down. Do this to the other gap too.
6.     You should have a square with four flaps after you have folded the two gaps. Take one of the flaps (it should have a gap in the middle) and poke into the gap, then fold the top of the gap down. Do this for all four of the gaps.
7.     Once you have done that, then you should have a diamond, kite looking shape that has eight flaps.
8.     If you have done this correctly, you should have a pocket on one side and if you flip to the other side, then there is no pocket. If you flip through all of the sides, you should see a pattern: pocket, no pocket, pocket, no pocket…
9.     Now have one of the pocketed side opened (the other sides can be folded down) and fold both flaps that are on the top on either side of that pocketed side into the middle. Make sure you cover the pocket. Then unfold the flaps, you should see two lines that intersect the line that the pocket has made.
10. Lift the pocket up and fold the two flaps that are on both sides inward to form a three perfect triangles (one triangle that is sticking up, and two triangles that point outward, one of the two triangles can be split), it might look like a spaceship. Fold the triangle that is sticking up down to cover the triangle that is split. Repeat steps 9 and 10 until all the pocketed sides look like the spaceships.
11. Now that all the pocketed sides are folded down, open the side that does not have a pocket. Once you have done that, fold the two flaps (that are in the opposite direction of which the small triangle is pointing towards) on either side of the non-pocketed side into the middle. Do this step for all four of the non-pocketed sides
12. The folding in step 11 may be difficult to fold, if so, then you are doing the step correctly. If the diamond shape now is thin, then it is correct.
13. Now twist the top side of the non-pocketed side downward to make the petals. Repeat step with all four of the non-pocketed sides.
14. Now you have a beautiful paper Iris!
Alternatives
Bouquet
1.     You may twist the petals in different ways, such as twist two of them instead of four to spice up the petals of the Iris.
2.     You can also color your Iris to match the real Iris's hues.
3.     Again, the color of your paper does not have to be white, I would recommend purple colored paper.
4.     Lastly, you can assemble many Irises in a bouquet of flowers.

Saturday, November 5, 2011

Demonstration Speech 1 Video Self Evaluation

Video Self Eval (demo 1)

Thursday, November 3, 2011

Domination of Demonstration #2

1. How to make a paper Iris
Making a paper Iris is not easy, it requires patience and demonstration skills. The paper Iris is actually quite hard to make, in fact, it is so hard, that everyone who sees you fold one will be astonished and filled with jealousy. To fold a paper Iris, you need a piece of paper that is a square. Also, the paper Iris is a beautiful piece of art that everyone enjoys. I would just teach the audience how to fold one correctly and tells them that it is useful when it comes to girls.

2. How to mix your own salsa
Salsa is a very delicious Mexican sauce that is glorious and filling. I would teach the audience how to mix their own salsa to make it taste awesome. The ingredients I would use would be tortillas, tomatoes, some mexican spices, onions, garlic, chinese parsley, and chilly. Salsa would be a great topic to demonstrate on the cafeteria. Also, it will be delicious to go with the lunch that the audience has. Salsa is also one of my favorite three sauces: ranch and ketchup.

3. How to make finger puppets
If you have children or any younger siblings at home, knowing how to entertain them by using finger puppets is a great way to satisfy them. Finger puppets are very fun to make, they are quite custom and full of colors, perfect for a youth. They are also easy to make, just add a few colors to the wrapping on your finger and you will love it. Finger puppets can also be a fantastic way to improve story telling.

4. How to make a delicious frozen berry salad
First of all, this dish is not a salad containing green vegetables, it is a mixture of various frozen berries and flavored powder. Berries are one of my favorite fruits to eat, they are sour and savory. However, when all of these beautiful tastes are combined within a chilled environment eaten in summer, they taste like transcendent tingles of tang. Pure deliciousness will engulf your stomach, addiction will vanquish your patience, and contentment will no longer exist.


5. How to cut fruit—the right way
Have you ever tried so hard to cut a fruit, but never seemed to turn out great? Of course you have, people in the modern times do not know how to cut fruit to make the juices stay and tastes flourish. I will be demonstrating how to cut three different fruit and some alternate ways to serve it. Knowing this ability will help the audience understand that food and how to serve it is important in every meal. Especially when fruit is the most important part of the meal.

Sunday, October 23, 2011

How to Build and Decorate a Kite

Materials
Kite that we are going to make
1.      Strong straight sticks of 50cm and 25cm (make sure they are long enough to cover the newspapers or the construction paper).
2.      Construction paper 50cm x 25cm (does not need to be exact)
3.      Newspaper—if construction paper is not available.
4.      Regular string or fishing line 100m (recommended), tape, or glue
5.      Safety scissors.
6.      Pencil or cylinder object—for the handle.
7.      Coloring utensils
 Steps
1.      Take each of the 50cm and 25cm sticks, and place them on top of each other to form a cross.
2.      Use glue, tape, or the string (recommended) to connect the sticks together in the middle. Make sure that the sticks are held in place and tied firmly together. Nudge them to test durability.
3.      Take the construction paper and use the scissors to cut them into the diamond shape of the stick cross. Do not leave any blank spots or the air will go through the paper. Do the same for the newspaper if construction paper is not available.
4.      Stick the cross to the diamond shape construction paper or newspaper with tape (recommended) or glue.
5.      Take the string and cut two pieces of string that is 15cm long, and then cut two pieces of string that is 12 cm long.
6.      Tie the two 15cm string to the 50cm stick’s two sides with tape, glue, or string (recommended).
7.      Tie the two 12cm string to the 25cm stick’s two sides with tape, glue, or string (recommended).
8.      Tie the four strings that are tied to the kite together, and tie about 40 to 50 meters of string to the place where the four strings are tied together.
9.      Wrap the 40 to 50 meters of string around the pencil or the cylinder object for the handle.
10.  Now you have a functional kite!
 Alternatives
1.      Use the coloring utensils to color or draw a picture onto the kite.
2.      Functional decoration: Cut three to five thin strands of newspaper or construction paper—about 30cm x 2.5cm and stick them to the bottom of the kite using glue or tape.
 Tips and Concerns
1.      Remember that the 50cm stick is up and down, and the 25cm stick is right and left. Tip for step 1
2.      A simple double knot is enough to hold the sticks in place. Tip for step 6, 7, and 8.
3.      Be careful when handling with safety scissors. Tip for step 3
4.      Glue and tape are necessary, but not recommended. Tip for step 2, 4, 6, 7, and 8
5.      For Alternatives, keep things simple, do not add weight to your kite or else it will not fly.

Monday, October 17, 2011

Domination of Demonstration

Iris, but in reality
1. The first topic is how to make a paper Iris. I learnt how to make one because I wanted to make Angela feel jealous about me. First, the basic materials are paper, hands, and a ruler if nesseccary. Second, You will need to fold the paper correctly as I told you. Third, and the last step is to make sure that you have the right curves for the petals. You can also customize your flower by coloring it or folding it in the desired color. I wanted to do this speech because flowers are a very useful way to get a girlfriend, and it helps calm myself down (at least for me).


2. Another topic is the some ways you can tie a tie. If you know how, then you can laugh at other people who don't know because it is extremely easy. I would know how to tie these tie in these ways by tying them in the speech and showing the audience that it can be done easily. Soon everyone will know how and it would be interesting for me too. I can also demonstrate on how to tie a bowtie, just to crack things up. First, I teach the audience on the first way to tie a tie: the windsor, the half-windsor, or the four-windsor. Then I can teach about the other ways to tie a tie. Tie are very formal, and it can help people to dress formally.


Naturally Fat Free?
3. Another "how to" is how to make jelly—the easy way. Jelly is a popular pastime enjoyed by children of all ages. Although it can be dangerous eating it, it is very fun when it comes to making it. First, the ingredients are jelly powder, it can be  bought in any grocery store, many bowls, water, and sugar (sometimes the sugar may be already added in the powder). Second, follow the instructions written on the back, which is usually adding water and the powder to a bowl and stirring it until the powder becomes a solution. Following, place the liquid in the refrigerator for about a day. The powder has probably provided the color for the jelly so you do not need to worry about it. Jelly is delicious and contains caffeine, which can be enjoyed in the class.

4. The fourth topic is how to make a kite and successfully fly it. It is a plain a simple task which can be done anywhere. You just need a few materials and combine them into a kite. Finally you can fly it outside the classroom and finally achieve something in your life. Also, kites are very fun to play with, now that Taiwan has entered the season of autumn, and kites are colorful!

Didn't expect that did ya?
5. The last topic is how to read a compass. Due to technology, discovering new places has become easy, but finding your way back is not. Compasses, to my understanding is not very easy to read at all. There are several different types of compasses which are read differently. Also, if you do not want to go north but the compass is telling you that, then there is a way to decipher the compass. I was once a boy scout, and compasses are the most interesting subject beside tying knots.